Aperture and depth of field
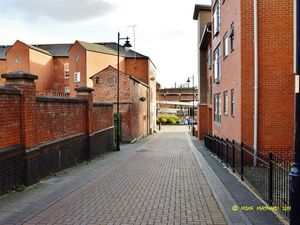
What do you think the subject is in this picture?
Narrow aperture
The cars under the street lamp really stand out in this photo.
The picture has perspective because the road sweeps around a bend away from us and looks narrower as it goes away. The house on the right looks bigger than those in the background. You can make out the cars in the background too, that's depth of field.
I looked for a good definition of depth of field this week and Nikon described it as having the background (the part of the picture behind the subject) in focus.
If you set your camera on landscape it will use a narrow aperture and a slower shutter speed to get that depth of field. For this picture, I couldn't go too narrow, F/16 would have produced a really dark picture or I would have had to have the shutter speed at about one second. I raised the ISO (the sensitivity of the sensor) and went for an aperture of f/6.3 and the camera set the shutter speed at 1/30 second. This was on the A for aperture priority setting. This is the setting most people go for after they have mastered the basic settings.
On the basic settings, like landscape, portrait, close-up, and sport, you can set the ISO and so make the sensor pick up more light which is useful.
On my Nikon, you can't set the white balance, and so you often get pictures that are too blue or too yellow. On aperture priority, you can set the white balance for different types of light. You can set it for sunny, cloudy, fluorescent or incandescent light sources. I have found this makes a big difference.
My Nikon is big and heavy and you might think more complicated with all the settings it has and a built in light meter. Actually, it is easier to set than most compact cameras. I tried to set the aperture yesterday on a compact camera, and couldn't without instructions.
Aperture Priority
On aperture priority (A), and the other settings like shutter priority (S), manual (M), and programmed auto (P), I can set the picture quality and size, the white balance, the ISO, the shutter release (single or multiple shots), the focus mode (usually manual or auto, but mine has single or continuous servo too), AF area mode (four different settings), metering (three settings), and finally exposure compensation and flash compensation.
If that all sounds too complicated, you have to learn all those setting bit by bit to get really good shots.
Photo shoot
Tomorrow, I'll be doing a photo shoot that will be both outdoors and indoors, and contain lots of people and movement. I'll check the light before I go, and set the white balance, probably on cloudy! The quality will be set to high, and size to small, as my camera can do really huge pictures.
At the actual event, I'll use aperture priority, setting the aperture with the thumb wheel easily and quickly. The focusing will be auto with matrix metering. I can then simply set the aperture to narrow for landscape type shots, and wide for some portrait type shots close up.
I'll use an 18 – 105 lens. I'll also use the sports setting for some shots, because it will change the aperture and shutter speed quickly for different shots.
At an event, quality of the shots isn't always the top priority, you have to be quick just to get the shot.
I'll use my speedlight (flash gun) for shots outside and inside.
Homework
This wouldn't be a very good lesson without some homework to do!
Set your camera on portrait and photograph something like a cup or mug close up. Then check out the result; the aperture will be wide, creating less depth of field. You should see the cup in sharp focus, but the background out of focus.
Now try a landscape shot of a subject like a car with the camera set on landscape. Is the background in focus? It should be. That is the depth of field a narrow aperture gives. Remember F/3.5 is a wide aperture (the widest on my camera) and F/22 is really narrow.
You could try a few shots with the camera set on A (aperture priority) and try different apertures. Set the white balance too and see the difference. My kitchen has cream walls and a fluorescent light. The walls look yellow in a photo, unless I set the white balance on fluorescent, then they look cream.
That's it for this post, experiment with your camera and see what it can do. You should get your cup in really sharp focus with the portrait setting. Compare that with a landscape setting which is more of a compromise, with the depth of field a narrow aperture gives. On my camera I can zoom in on the background when I preview the image and check if the background is in focus.
Do you have a question? Please use the comments box. You might have to check your manual to see where some settings are. Remember you can also follow me on Twitter. In Queen's Square (West Bromwich) tomorrow is the launch of Creative Black Country. I'll do my best to be there, hope it doesn't snow…
You can still check out Mike's article on landscape photography too.
You can view the original post on Mike's other blog, A Zillion Ideas, here.